
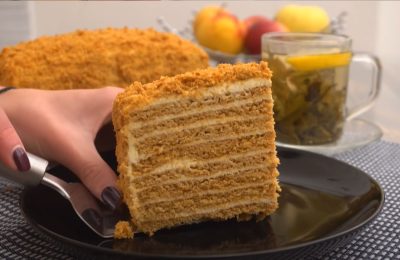
General's Royal Cake: A Classic Step-by-Step Recipe
Today, we offer you a classic step-by-step recipe for a truly "royal cake," combining four types of cake layers and a delicate sour cream-based frosting. The royal cake has a rich history, and in various cookbooks, it is also called "The General," "Lady's Whim," and "Fairy Tale."

- Proteins: 5.8 g
- Fats: 24.3 g
- Carbohydrates: 51.0 g
- Total time:
- Time in the kitchen:
-
Complexity:
It's easy and straightforward to prepare, but it does require some experience. Not everyone can do it right the first time.
- Number of servings: 8
Along with Napoleon, Prague And Honey cake The General cake became a legendary dessert of the Soviet era, as this recipe can be found in many cookbooks from that era.
It's worth noting that even when following the classic recipe, many people make king cakes their own way. It's unlikely you'll find the incredibly beautiful version pictured here, but we'll tell you how to make an incredibly delicious king cake at home.
We guarantee it will become your favorite cake, and your guests will definitely appreciate your efforts and the delicate, multifaceted flavor of the dish, because the General truly is the most delicious of all desserts made with sponge cake layers.
To prepare we will need:
- mixer (we have a planetary one, but a classic hand mixer will do as well);
- mixing and whipping containers;
- whisk;
- shoulder blade;
- sieve;
- a baking pan with a diameter of 18 cm (or better yet, two);
- foil or parchment paper for baking.
-
Wheat flour160 G
-
Starch30 G
-
Egg C13 pcs
-
Sugar220 G
-
Sour cream 15%330 G
-
Baking powder12 G
-
Nuts60 G
-
Dried apricots70 G
-
Poppy50 G
-
Cocoa powder10 G
-
Sour cream 20%500 G
-
Cream300 G
-
Powdered sugar120 G

Step 1 – Prepare the cake layers
In a large bowl, combine all dry ingredients—flour, starch, and baking powder. Mix thoroughly until smooth.

Crack three eggs into a mixing bowl. Add a pinch of salt and 220 grams of sugar.

Beat with a mixer until a dense elastic mass is formed, as when preparing a classic sponge cake.

Sift half of the dry mixture prepared in the first step into a container with whipped egg whites through a sieve.

Mix everything thoroughly until a homogeneous mass is formed.

Add 330 grams of sour cream to the dough and knead the dough again by hand with a regular whisk.

Sift the remaining half of the dry flour mixture and finish kneading the dough.

As a result, you should get an elastic, not too thick dough (as in the photo), without any lumps.
Divide the finished dough into four equal portions. You can do this by eye or using a scale (just remember to account for the bowl's own weight). Each portion will be a separate cake layer. Each layer will have its own filling.

Mix the first layer of cake. To do this, add 60 grams of roasted and chopped nuts to the dough and stir with a spatula.

Mix the second cake layer. Add 70 grams of finely chopped dried apricots and stir.

For baking, we will use forms with a diameter of 18 cm, having previously covered the bottom with foil or parchment.

Transfer the dough into the molds, carefully distributing and leveling with a spatula.

You can check the doneness of the cookies with a wooden skewer. Baked dough will not stick to the skewer when pierced.

Let the finished cakes cool for 5 minutes and remove them from the molds, carefully cutting them in a circle with a knife.

Knead the third cake layer. Add 50 grams of dried, unsoaked poppy seeds to the dough. Knead until the poppy seeds are evenly distributed throughout the dough.

Let's mix the fourth cake layer. It will be just cocoa. Add cocoa powder to the dough and mix thoroughly.

We transfer the poppy seed and chocolate dough into the molds and, just like before, put them in the oven for 20-25 minutes at a temperature of 170℃.

Place the finished cakes on parchment paper and leave to cool completely while we prepare the cream.

Step 2 – Prepare the cream
Making the cream is quite simple, but it uses weighed sour cream, which must be prepared in advance. Place the sour cream in a bag made of several layers of cheesecloth and refrigerate it for several hours (or overnight if possible). To help remove moisture, place a regular box of butter or other additional weight on top. All excess moisture will drain off, leaving the remaining mixture in the cheesecloth for further preparation.

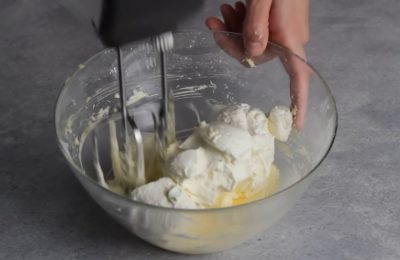
Whip the chilled cream with a mixer at low speed to avoid overwhipping. When the cream begins to thicken, gradually add 120 grams of powdered sugar and continue whisking until the mixture forms soft peaks when you remove the whisk.

Add the weighed sour cream and bring our delicate homemade butter cream to a smooth consistency.

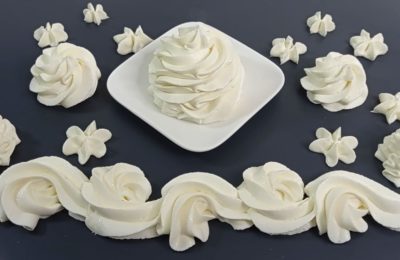
The end result is a soft, elastic, and delicious cream. Visually, it's more airy and delicate compared to custard, but it’s perfect for our cake thanks to the slight sourness that the sour cream adds.

Place the ring on a plate, line the edges with baking paper or acetate film, and place the first layer of cake (we used the nut layer, but you can arrange the cakes in a different order if you prefer).

We spread the first cake layer with cream.

We put the second cake layer (we have one with poppy seeds) and also spread it with sour cream.

We put the third cake layer (chocolate) and also cover it with cream.

We top everything with the final layer (ours is with dried apricots) and refrigerate the cake in the pan for at least 4 hours, or even better, overnight, so the layers can soak thoroughly. At this point, we should have some cream left over for the final frosting. It's best to transfer the cream to a plastic bag and refrigerate it as well.

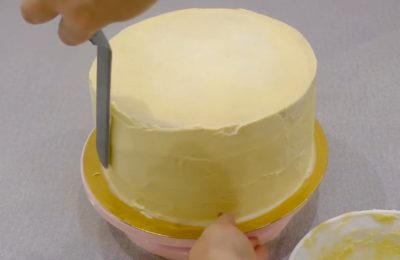
When the cake is well soaked, remove it from the pan and remove the baking paper lining the edges.

We do the final coating of the cake with the remaining sour cream.
Our Soviet-era legend cake is ready! All that's left is to decorate it, choosing a unique design of your choice.

You can simply sprinkle with grated cookies, chopped nuts or cocoa, add small multi-colored meringues or draw chocolate curls.
There's another version of the king cake that uses buttercream, not sour cream, and a condensed milk-based filling. Watch this video to learn how to make this alternative version of the "General" cake:
- 4 hours 28 minutes
- 276.2 kcal
- 19574
- 1 hour 40 minutes
- 391.5 kcal
- 14889

- 10 min
- 72.1 kcal
- 1327
- 5 hours
- 288.3 kcal
- 186
- 1 hour
- 209.4 kcal
- 744
- 45 min
- 547 kcal
- 365

- 3 hours 20 minutes
- 360 kcal
- 503
- 15 min
- 268.8 kcal
- 572