
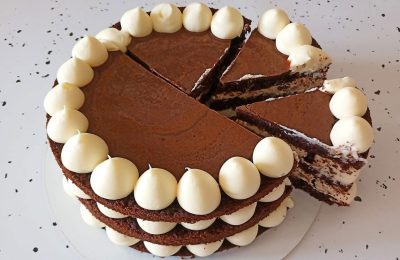
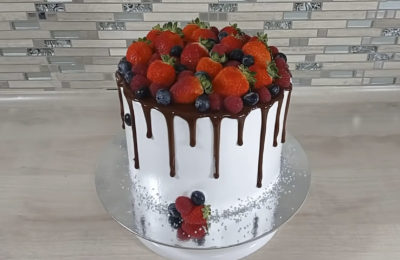
Blackberry Brownie Mousse Cake
You've probably often encountered exquisite mousse desserts in restaurants, consisting of several different layers. Typically, cooks avoid making these cakes at home, citing the difficulty of preparation and the unavailability of the ingredients. Today, we'll tell you how to make a restaurant-quality dessert at home, ensuring it has a delicate berry flavor.

- Proteins: 4 g
- Fats: 14 g
- Carbohydrates: 21.7 g
- Total time:
-
Complexity:
This is a complex recipe. Only try it if baking cakes is your usual go-to.
- Number of servings: 1
The base of this cake will be homemade brownie, the highlight of which will be a nutty layer. We will get acquainted with various textures, with fills and fillings. Once you've made this cake once, you'll never be able to deny yourself this pleasure again.
-
Fresh blackberries300 G
-
Sugar50 G
-
Sheet gelatin4 G
-
White chocolate100 G
-
Classic yogurt100 G
-
Cream 33%70 G
-
Gelatin4 G
-
Egg C11 pcs
-
Dark chocolate20 G
-
Butter20 G
-
Wheat flour20 G
-
Baking powder1 tsp
-
Vanilla sugar9 G
-
Salt0.5 tsp
-
Walnuts50 G
-
Nutella nut spread20 G
-
Milk chocolate20 G
-
Fresh blackberries250 G
-
White chocolate180 G
-
Cream 33%250 G
-
Sheet gelatin5 G
-
White chocolate60 G
-
Cocoa butter40 G
-
Gel dye (fat-soluble)2 drops

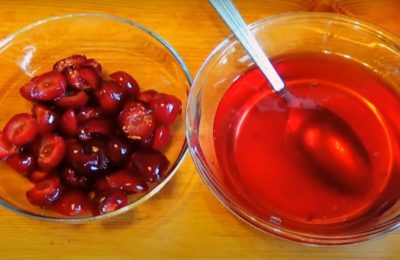
Blend fresh blackberries until smooth. Then, strain the resulting mixture through a sieve to remove the seeds.

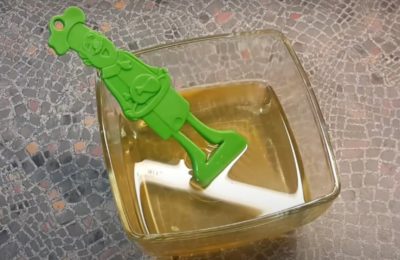
Soak the gelatin sheets in cold water for 10-15 minutes.

Add sugar to the saucepan with the blackberry puree and mix well. Then place it over medium heat and, stirring constantly, bring the mixture to a boil until the sugar melts. Remove from heat.
Squeeze out the gelatin sheets and add them to the hot puree, quickly stir until the gelatin dissolves.

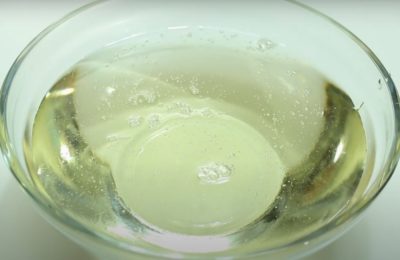
We cover the culinary ring with cling film, then carefully pour our blackberry puree into the resulting form.
At this stage, you should check the height of the layer with a toothpick; it should be no more than 1 cm.
Next, place the mold along with the hard surface in the freezer for about 1 hour.

To prepare the white chocolate cream, soak the gelatin sheets in water again.
Add yogurt to the cream and stir until smooth.

Place the saucepan with the cream and yogurt over medium heat, stir constantly and bring to a boil, but do not boil the cream, then remove it from the heat.
Next, squeeze out the gelatin and add it to the hot mixture, as last time.

After this, add the white chocolate to the mixture and mix thoroughly. You can also blend the cream to remove any lumps.

Pour the chocolate mixture over the blackberry layer and place back in the freezer for 1-2 hours.

To make the chocolate sponge cake, melt the chocolate with butter over low heat, stirring occasionally.

Separate the egg whites from the yolks. Add vanilla sugar to the yolks and whisk until fluffy, about 3-4 minutes. Then pour the cooled but warm chocolate mixture into the yolks and mix until smooth.

Add baking powder to the flour and stir. Then add this mixture to the chocolate mixture and knead into a dough.

Add salt to the egg whites and beat with a mixer until stiff peaks form. Then gradually fold this egg white mixture into the chocolate mixture and mix gently.

Line a silicone mat with parchment paper and place a culinary ring on top. Place the prepared dough inside and smooth it out.
Bake the biscuit in an oven preheated to 160 degrees for 15-20 minutes.
Let the finished sponge cake cool, then carefully run a string around the sides of the pan and remove the cake. Wrap the finished sponge cake in cling film and refrigerate it; this will help it stabilize and prevent the cake from crumbling.

To make the nut layer, add nut butter and melted chocolate to the chopped nuts. Then mix everything together.

Remove the sponge cake from the refrigerator and cut off the top, which should be no more than 1 cm thick. Then spread the nut filling over the sponge cake and place it in the refrigerator.

To make the blackberry mousse, soak the gelatin sheets in water. Place the blackberry puree over low heat and bring to a boil, stirring constantly. Then remove from heat and add the squeezed gelatin, mixing thoroughly.

Place the white chocolate in the same bowl and mix until smooth. You can use a blender to blend the mousse to eliminate any lumps.

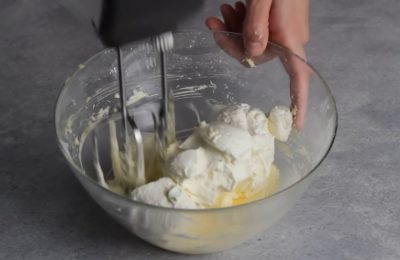
In a deep bowl, whip the cream until soft peaks form. Then gradually fold it into the mousse and fold gently. The mixture will become thicker and lighter in color.

To assemble the cake, place a silicone mold on a hard surface. Spread the blackberry mousse into it, 1 cm thick, and freeze for 10 minutes.
We take our filling, consisting of a layer of blackberry and a layer of chocolate, out of the freezer and remove it from the mold. Then we place it on the hardened mousse, blackberry side up, and spread more mousse on top, filling the sides as well.

Immediately remove the sponge cake with the nuts and, nut side down, lightly press the cake into the mousse. Refrigerate for 8-10 hours.

To make chocolate velvet, melt the cocoa butter over medium heat and pour it into a container.
Next, add melted white chocolate, food coloring and mix everything.
Afterwards we can blend it to get a smooth consistency.

Prepare the area so as not to stain the kitchen; an upside-down box can help. Using an airbrush, apply velvet to the cake, gently rotating it with your other hand.
The finished dessert should be frozen before this step. Once it's completely covered in velvet, we refrigerate it for a few hours to thaw.
Then we decorate the cake to our taste and can begin serving.
Adviсe
- To make it easier to use the airbrush, take the box and turn it on its side, then place a stand inside on which your cake will stand.
- In this case, a silicone mold is the most convenient option for assembling the cake. However, you can also use a springform pan lined with cling film or parchment paper.
- To carefully remove the filling from the culinary ring, let it sit at room temperature for a while, and then use gentle squeezing movements to remove the filling.
Design and submission
Since this mousse cake is made with blackberries, it would be appropriate to garnish the dessert with them. You can also add other berries; they will perfectly complement the cake's color scheme. To add a fresh touch and highlight the pink tones of the dessert, garnish it with mint leaves.
- 7 min
- 141.4 kcal
- 543
- 5 min
- 208.6 kcal
- 903
- 1 hour 30 minutes
- 380.0 kcal
- 5765
- 15 min
- 268.8 kcal
- 572
- 5 min
- 188 kcal
- 3662
- 20 min
- 542 kcal
- 291
- 20 min
- 150.5 kcal
- 1239
- 5 hours 10 minutes
- 534.0 kcal
- 4310